Pages

Showing posts with label makeup. Show all posts

Wednesday, June 27, 2012

Makeup Monday: Brown Eyed Girl


Today's look: deep brown eyes with a graded wash and a smudged plum lip. I had major bedhead, so I ran with it and just teased and frizzed my hair. I didn't go out like this; don't worry:)

Want to know what I used and how I created this look? Continue reading after the jump!


1) MAC Bare Study paint pot, 2) MAC Fix+, 3) MAC Coco pigment, 4) MAC Mulch eyeshadow, 5) MAC Vanilla pigment, 6) MAC Dipdown fluidline, 7) Prescriptives dark brown mascara


The first two brushes are for blending: I used the one on the left for blending the darker colors and the second one for blending the vanilla pigment (to avoid a muddied highlight). The next brush is perfect for the crease and just above. The last brush was used for the lid and lower lashline.


Eyes: 
Step one:
Using your finger or a brush, apply a base all over your lid, blending up to your brow bone. I used MAC Bare Study paint pot (product 1). 
Step two: Spritz your eyeshadow brush (like the last brush in the second picture) with Fix+ (product 2) or water (spray, don't soak). Dip the brush into a shimmery taupe pigment such as MAC Coco (product 3) and use the back of your hand to make sure it's blended onto your brush. Wetting the brush will keep the pigment from going all over your face (since it's loose) and intensify the color.
Step three: Apply the dampened pigment all over your lid.
Step four: Using a dry brush (I used the brush second from the right), pick up a bit of the shimmery taupe (product 2) and tap off the excess. Apply this into your crease and just above. This will soften the edges of your first application, but still blend those edges up and out, using small circular motions (with a fluffy brush).
Step five: Using the same brush you already spritzed, apply dark brown eyeshadow (product 4) to the lower half of your top eyelid, concentrating the darkest color toward your lash line. Blend into the taupe with a fluffy brush (first brush pictured).
Step six: Using a clean fluffy brush, apply a shimmery light neutral (product 5) to your brown bone and near the tear duct. Blend.
Step seven: Line your upper and lower lashline, as well as your waterline, with dark brown liner (I used product 6 with a bent liner brush).
Step eight: go over your lower lashline with a dark brown eyeshadow and blend (product 4) 
Step nine: Apply dark brown mascara (product 7)


MAC Porcelain Pink skinfinish (cheeks) and Clinique A Different Grape Lipstick.


Cheeks and lips:
Apply light pink blush to the apples of your cheeks. Smudge a plum lipstick on your lips (use your fingers!)

The end result should be a dark brown eye that gradually gets lighter toward the brow and an imperfect plum lip. Any questions? Please feel free to ask!


Love love,
Keiko Lynn

Tuesday, June 26, 2012

Makeup Monday: Cheap Thrills and Quick Changes


(Revlon lipsticks - all purchased at CVS)


When it comes to drugstore brands, I'm a bit of a Revlon fan girl. I'm particularly fond of their lipsticks, which come in a bajillion (give or take a few) shades and finishes. I'm a lipstick girl for more than one reason, but mostly, I love that it can change your look in just one step! Since becoming a CVS Beauty Board member, I've probably been spending a little too much time in their makeup aisle. I only recommend products I actually use and stand by, so naturally I have to try everything out. I've found a slew of new favorites (and a couple of misses, which I promptly returned) in the Revlon lipstick section alone, which I have showcased in the pictures above.

Isn't it crazy how just one swipe of lipstick can completely change your look? I'm wearing the same face and eye makeup in each (though the lighting is different in a few). What's your favorite lipstick of the moment?


Wednesday, June 20, 2012

Makeup Monday: Do Bad Things


True Blood is over for the season (booooo!), so I decided to pay tribute by doing my own vampy look, partially inspired by Pam, but also by the ubiquitous promotional image. I love a good statement lip, but sometimes I like to break the rules and pair it with dark eyes. On a side note, are my lashes growing yet? I've been using NeuLash for a few weeks now, but I can't tell if it's working or if I'm just making myself believe it is. That whole placebo thing gets me every time. /tangent

For the photo above, I used MAC Pro Longwear in Alta Moda, with a coat of the Mirror Gloss (it's sparkly and comes with the pro longwear). For the video, I switched it up and used a lipstick. Everything I used is mentioned in this horribly awkward video, so please check it out! Proceed with caution...I'm not meant for video!


Love love,
Keiko Lynn

Tuesday, June 19, 2012

Makeup Monday: Recreate the Runway (Rachel Roy/Bobbi Brown)


I'm a fan of monochromatic makeup, so I was really excited to recreate Bobbi Brown's understated version of the trend. Rosy colors are very feminine and wearable for daytime, but the metallic finish of [what I consider to be] the hero product of this look (Rose Gold shadow) make it extra special.

I made a stop at Sephora to pick up some of the products I needed for this look, not realizing that much of the makeup used backstage at Rachel Roy will not be released until their Spring '12 collection. I had to do a little bit of guess work; I used some products I already had and found a comparable product substitute for cheeks and lips. The crease color I used brought out the peachier undertones - something a little more neutral would let the rosiness shine through a little better. Ah well, I will try again when the collection comes out!

For step by step instructions and the makeup I used, continue reading after the jump.


Makeup used:
Eyes:
UD Primer Potion
Bobbi Brown Rose Gold Shimmer Wash Eye Shadow (lid and lower lash line)
UD Baked shadow (crease - in place of Copper Long-Wear Cream Shadow, which will be released for Spring '12)
brown liner (upper waterline - optional)
mascara

cheeks and lips: 
Bobbi Brown Pot Rouge in Pink Truffle (in place of Uber Beige, which will be released Spring '12)


Done!

 
p.s. If you recreate this (or an other) look, please share it with me on my twitter or facebook.

Wednesday, June 13, 2012

peek


The dream of the 90s was alive at Nicole Miller.


Sneak peek of backstage makeup at Billy Reid with MAC.


I'm obviously terribly behind on everything - makeup posts, outfit posts, NYFW posts...everything. With my two friends in town and many fashion week and non-fashion related obligations, I haven't had a chance to sit at my computer for more than two seconds at a time. I'm really excited about this season, because I decided to take my Recreate the Runway makeup features and bring them backstage, where I can learn how to create the look (and share it with you). In the meantime, just wanted to check in and let you know that I'm alive, and to share a few quick photos from earlier in the week!

Wednesday, June 6, 2012

Makeup Monday: My Makeup Bag Essentials


Since I regularly started carrying a few smaller bags, I have also streamlined my makeup bag. I gravitate toward larger handbags that could easily double as luggage, and test their max capacity. I carry everything in my bag: a large camera, change of shoes, overstuffed wallet, small children. My makeup bag is/was no different. I used to carry half of my train case with me! The great thing about downsizing from time to time is that it keeps me disciplined. I only carry the essentials - and that's more than enough. What are my essentials? Here's what made my cut:


makeup bag essentials
(mouse over to see product details and where to buy)
Whether I'm starting from scratch or touching up throughout a long day, I always have what I need on hand. If I am wearing a specific look, I'll add a couple of products to the bag just for touch ups. In order to avoid bulk, the trick is to employ multi-purpose products. My brow kit comes with a tinted wax, shadow (which can double as eyeliner), mini tweezers and two mini brushes - all in one handy kit. My favorite lip product is meant to double as a cheek color, which can be applied with just your fingertips (no brush necessary). Mascara and a concealer/highlighter duo wake up tired eyes, while the concealer end also hides blemishes. Primer and skinfinish powder even out skintone and keep the shine to a minimum; blotting papers soak up excess oil throughout the day. As for Burt's Bees, I'm just addicted to it.
What's in your makeup bag?

Love Love,
Keiko Lynn

p.s. My makeup bag and cute little birdy mirror are both from Grr Feisty:)

Tuesday, June 5, 2012

Makeup Monday: Smokeout


Urban Decay recently sent me their new Book of Shadows (IV), so I obviously had to play around with it. If you follow me on twitter, you might remember me tweeting a preview pic of the pretty butterfly packaging. Now, I want you to keep in mind two important things about me: I judge books by their cover and I'm a sucker for gimmicks. Read on.

Many of the colors in this palette are more subdued, though Urban Decay is well known for their vibrant colors. They're still really pigmented, though, and if you (like me) do not own the Naked Palette (you should - and so should I), this is a nice change from the usual brights. Pair this with the 15th anniversary palette that I used here and here and you're pretty much covered on all fronts. I'd say this is especially ideal for beginners because it has five tutorials, sixteen eyeshadows that aren't intimidating, primer potion, mascara and liquid liner.

The palette comes with a QR coded tutorial card, mini speaker and a setup for your phone (so you can watch your tutorials and do your makeup at the same time). I've read a few comments and reviews from people who thought this packaging was gimmicky. Well, maybe - but gimmicks are the besssssst. You're talking to a girl who lives for infomercials and is occasionally known to purchase weird things like Bumpits and Shake Weights in the middle of the night. Plus, I actually think this is quite handy. I had no issues scanning the QR codes and the tutorials were clear and helpful. I even decided to forgo my usual step by step tutorial and follow theirs. I chose the Smokeout tutorial, because much like my gimmicks, I'm also a sucker for a smokey eye. Watch the Urban Decay tutorial here to see how I got this look. Note: I didn't use their gloss - I patted on a teeny bit of Bobbi Brown's lipstick in Rose and then a little Burt's Bees. More photos after the jump!


Wednesday, May 30, 2012

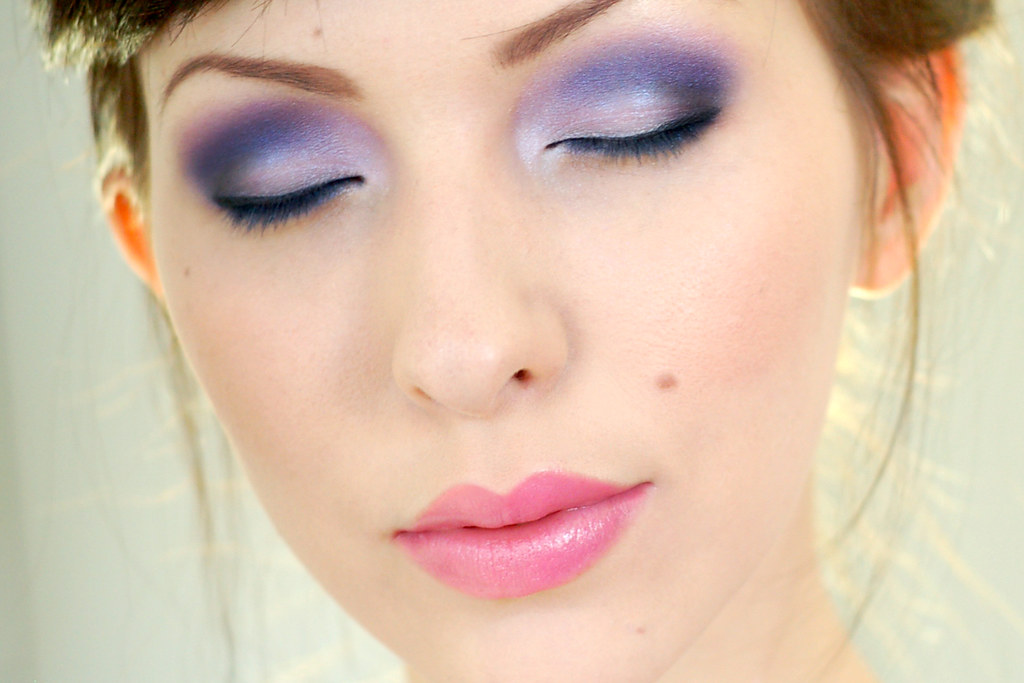
Makeup Monday: Purple Gaze


This is a look best suited for night time, but if you ask Kimberly, any of your local drag queens, or me, you can totally wear this in the daytime. Eff your day/night rules! (This is as rebellious as I get.) The trick is - you guessed it! - blending your shadows, both inward and outward. At night, you might be able to get away with poorly applied shadow, because you're probably in dim light. Daylight is not forgiving. Diffuse those harsh lines, or you'll look like a mess. Think of it as art. Blend, mix, layer, shade.
To see the products and instructions, keep reading!

EDIT: I added an image link to a full size photo of the makeup look - after the jump:

Products used:
1) MAC Bare Study paint pot
2) Make-up Designory Opal Sky eye shadow (c/o MUD)
3) MAC Parfait Amour eyeshadow
4) MAC Freshwater eyeshadow
5) MAC Jeweltone
6) MAC Pink Pearl pigment
7) Make-up Designory smoked sapphire eyeshadow (c/o MUD)
8) MAC blacktrack fluidline
9) MAC Bunny Pink Lipstick (borrowed from Kim)

Brushes (from top to bottom): MAC 239SE (regular shadow brush), ELF defining eye brush (great for crease), Sonia Kashuk fluffy blending brush, Sonia Kashuk bent eyeliner brush

Step one: Apply MAC Bare Study (product #1) all over lids and up to your brows. Just use your fingers - it's much easier to apply this way. You want this to cover everywhere your eyeshadow will be, so this is a great time to lay out the shape of how you want your eyeshadow.
Step two: Using the fluffy blending brush, apply a shimmery white (product #2 - this one has an opal sheen) to your inner and middle lid, and inner tear duct.
Step three: Using the regular shadow brush, apply a medium purple (product #3) to the crease and just above,  and to the outer lid  - blend up and out
Step four: Layer a shimmery fuschia over the purple (product #6) and blend the two together. MAC Pink Pearl pigment is similar to their eyeshadow, stars n rockets. It's a fuschia/purple shimmery color - one of my all time favorites!
Step five: Pack (not swipe) a dark purple eyeshadow (product #5) into the outer crease only, using ELF defining brush
Step six: Pack a dark navy eyeshadow (product #7) into your outer V (the outer lid and very outer lid, which makes a horizontal V). Blend the last two darker shadows like crazy - I prefer to use the defining brush to blend the darker colors first, then go back over it with a little more of the lighter shades (on the outside) with the fluffy brush. This will help to blend it a little more. You want this to look soft, since the colors are severe.
Step seven: Line your top and lower lashes, as well as your waterline, with your eyeliner of choice (I used fluidline (product #8 - with bent eyeliner brush).
Step eight: Layer a bright blue eyeshadow (product #4) over your lower lashline. Reapply liner to your waterline if necessary.
Final step: Mascara! I missed this step. I totally forgot to put mascara on.

I paired this look with Kim's Bunny Pink MAC lipstick, but you can use whatever shade you prefer. On the cheeks, I applied MAC Petticoat Mineralize Skinfinish, but any pink blush will do!


EDIT: Click the image to see a very large version...I figured this would make it easier to see the detail.


Love love, 
Keiko Lynn